BSides Adelaide 2026 Hardware Badge UART Writeup
Overview
Following the previous post on the BSides Adelaide 2026 hardware badge, we recall that a potential UART connection was found on the rear of the badge.
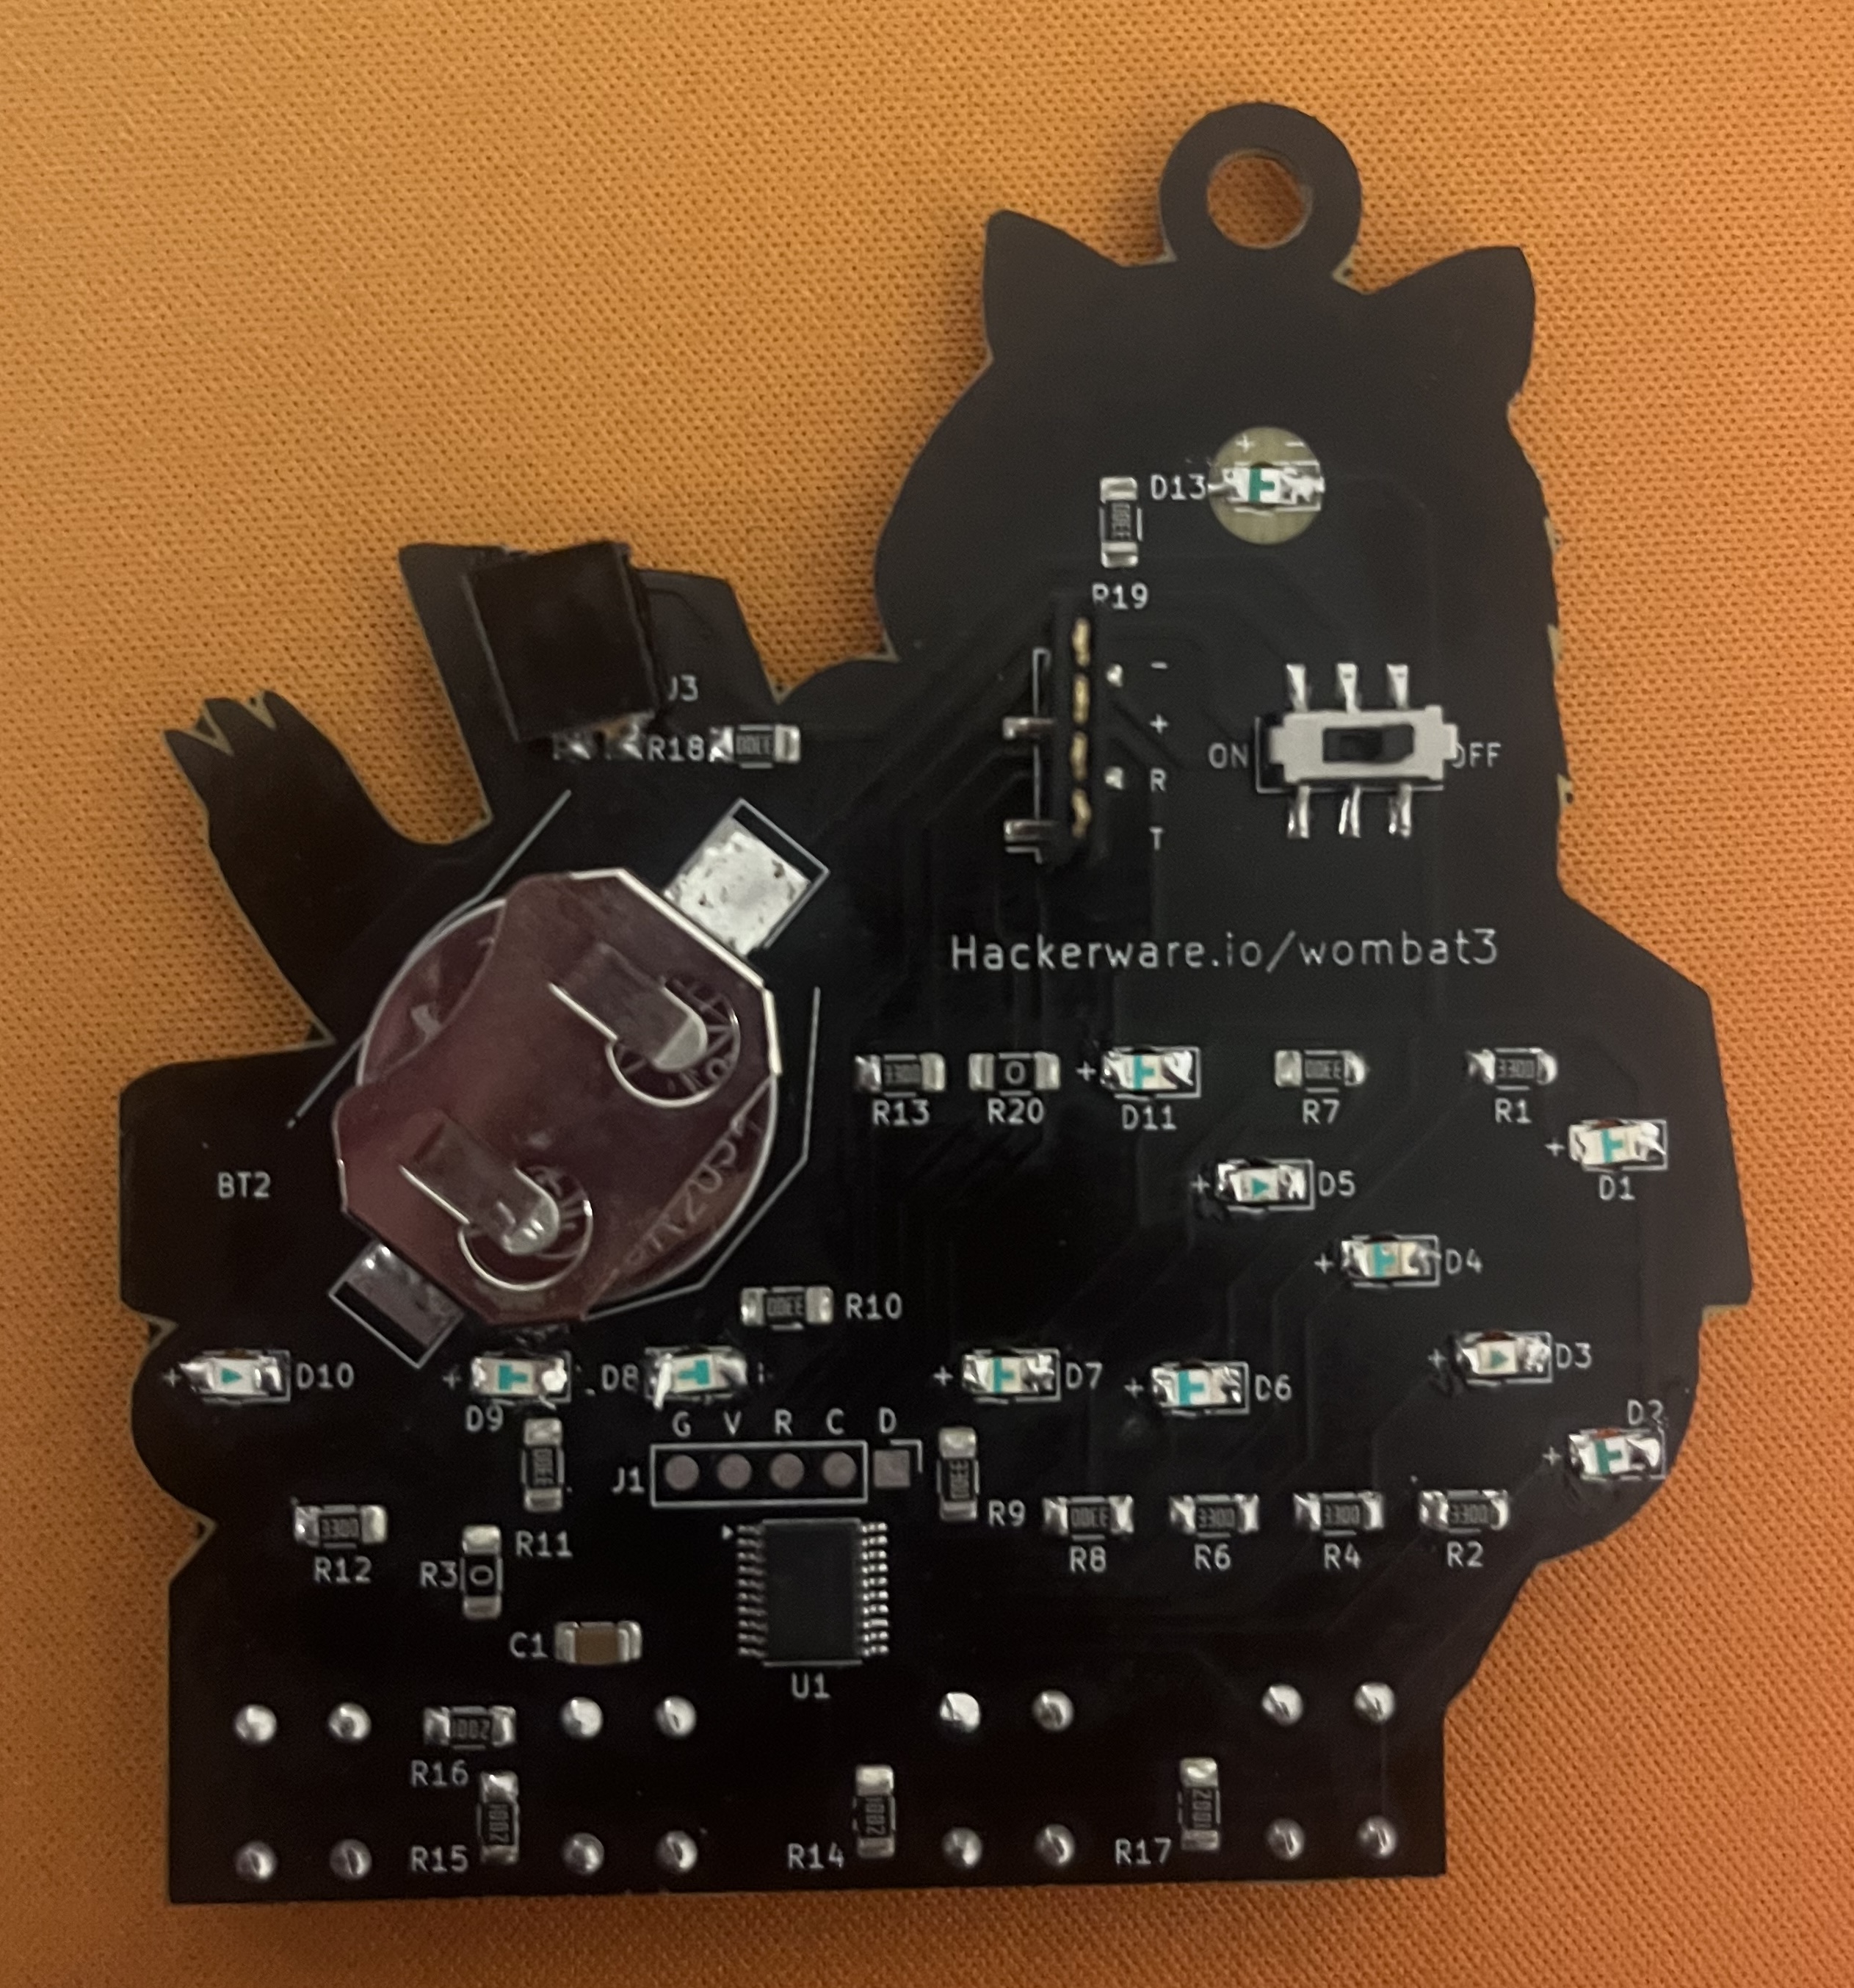
Many thanks to those who helped with digging into the UART during the conference, Phil was invaluable in cracking this.
What is UART?
UART is one of the most common methods to communicate with hardware devices, with it often exposing a simple command like interface.
There are many ways to identify potential UART connections on hardware, the simplest is looking for 4 pins which may have labels such a TX and RX, or sometimes it is labelled straight up as UART/TTL/Console
On the badge the pins are labelled +, -, T, and R which we can quickly interpret as VCC, GND, TX, RX. The VCC pin could be used to supply power, when the badge is set to “off”
Connecting to these pins will require a USB to TTL/UART adapter, these can be obtained from sites like AliExpress for a few bucks. For myself I use a Tigard which is more costly by comparison, but enables many other use cases, and also supports better voltage selection.
With a Tigard we simply connect the pins as below, and set the Tigard to VTGT mode before plugging into the computer, which will ensure all communications occur at the targets voltage level.
Note: Remove the connector header that may be installed on the badge to protect the human wearing it and the badge’s pins
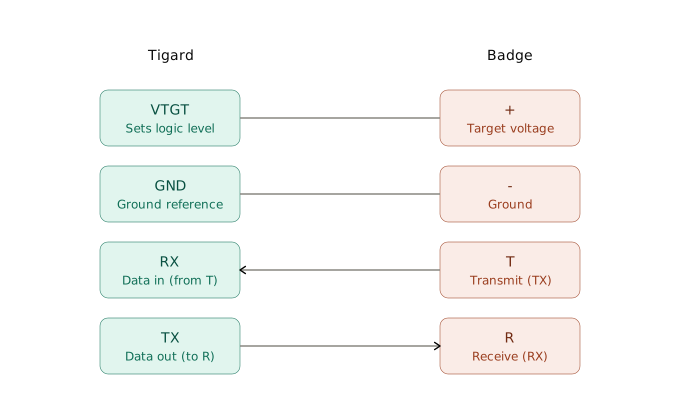
Once we have that wired up and connected to the computer, lets get hacking!
Establishing Connection
Connecting to a USB UART adapter from Linux/Mac is relatively simple, I have found the tio utility to be fantastic with the ability to list devices, log output, auto reconnect, and overall provides an easy interface.
Using the handy --list argument with tio we can list all the available serial devices, and also see when they were connected, so all we need to do is identify the most recent device.
tio --list
Device                           TID     Uptime [s] Driver           Description
-------------------------------- ---- ------------- ---------------- --------------------------
/dev/cu.debug-console                   1644696.655
...
/dev/tty.usbserial-TG1115860                  5.373
We will need to determine the baud rate when connecting to the device as well, in almost all instances it will be either 9600 or 115200, without a logic analyser the easiest way to work this out is just connect at one baud rate and see what happens when the badge is turning on.
Using 115200 as the baud we get output after turning the badge off and on
tio -b 115200 /dev/tty.usbserial-TG1115860
[00:26:02.900] tio 3.9
[00:26:02.901] Press ctrl-t q to quit
[00:26:02.904] Connected to /dev/tty.usbserial-TG1115860
KANGAROO FIELD COMM UNIT
HOME BASE: C3
COVERT MODE ACTIVE

type HELP for commands
Now what can we do with this?
Byte by byte
After getting a connection and powering the device, we noticed the HELP command being suggested to us, lets have a look at that…
Trying to type in this terminal is horribly slow, we are getting a character through every few seconds, and often losing characters due to this delay.
Either this was intentionally designed to prevent brute forcing, or as later advised on the Discord a simple bug due to the complications when building software for the badge without the hardware on hand.
During my drive home from the first day, I had a thought that potentially the LED pattern was using a “sleep” between LEDs which would cause the microcontroller on the badge to lock up, essentially waiting for the entire pattern to complete before retrieving the next byte from the serial input.
Recalling the badge had a mode button, if we hold it down it changes the LED patterns, with one pattern having all the LEDs light up constantly, and luck enough this appears to get rid of the potential “sleep” in the code I had suspected.
Returning to the console we can now easily type the HELP command and get the output!
> help
commands:
  STATUS
  LOG
  TX
Lets explore the commands available to us
Command: status
Entering the status command we quickly get out first flag!
> status
AGENT ID : KNG-447
CALLSIGN : KANGAROO-1
FIRMWARE : 3.1.0 / 2026
MODE     : COVERT
PWR      : 308.1 W
TEMP     : 22 C
STATUS   : ACTIVE
HOME BASE: C3
----------------
R.AKALI 2026-07-10
bsadl26{...redacted...}
----------------
It also appears to provide other information that might be needed, but could also just be for “styling” to make it feel more immersive, either way lets note down the output (the HOME BASE looks interesting…)
Command: log
With one flag down, lets see what the log command gives us
> log
COMM LOG [ARCHIVED - PRIOR SESSION]
TX: A3 C3 DD 01 BC
RX: ACK
TX: A3 C3 DE 03 BD
RX: -23.76 133.72 ALT:638
TX: A3 C3 DF 01 BE
RX: ACK
TX: A3 C3 DF 01 BE
NO RESPONSE
TX: A3 C3 E0 02 82
RX: PWR:312.4 TEMP:-81
-- END ARCHIVE --
Interesting to note it appears to be a sequence of commands that have been issued to the badge, with some returning GPS coordinates and environmental details.
It’s also interesting to note that the HOME BASE value from the STATUS command makes an appearance in all the commands in the second byte (C3)
This looks to be a great start for digging deeper on the badge and potential challenges, but first lets check what that tx command does.
Command: tx
Issuing the tx command it looks like we need to give it 5 bytes which is also what we saw in the log output
> tx
ERR: packet must be 5 bytes
> TX A3 C3 E0 02 82
NO RESPONSE
Repeating an existing command however gives an unexpected NO RESPONSE, looking back at the log output we did actually see that a repeated command gave this response as well, could there be some sort of replay protection happening?
TX Command Byte Structure
It would appear for us to unlock more of this badge we will need to determine the 5 byte command structure so we can issue additional commands, we did determine the 2nd byte was likely related to the HOME BASE value we saw in STATUS at the start, which leaves us with 4 bytes to work out.
| Position | Description |
|---|---|
| 1 | Unknown |
| 2 | Home Base ID |
| 3 | Unknown |
| 4 | Unknown |
| 5 | Unknown |
Utilising Claude for this it quickly determined the 5th byte was a XOR checksum (A3 ^ C3 ^ DD ^ 01 = BC) which would make sense for the last byte.
The 1st byte appears to be constant, so lets focus our attention to the 3rd and 4th byte, we identified earlier that replaying a working TX command would fail so one of these bytes is likely to be a “replay protection” which increments a counter.
To test this theory, lets take the last working command from the log, and increment either the 3rd or 4th byte and see if we get a result…
> log
COMM LOG [ARCHIVED - PRIOR SESSION]
...
TX: A3 C3 E0 02 82
RX: PWR:312.4 TEMP:-81
> TX A3 C3 E1 02 83
RX: PWR:308.1 TEMP:-83
> TX A3 C3 E0 03 83
NO RESPONSE
Success! We observe that issuing the same previous command but slightly incremented we can get a response, and based on this it looks like the 3rd byte is the replay sequence, and the 4th byte is likely to be the request value.
| Position | Description |
|---|---|
| 1 | Unknown but constant (A3) |
| 2 | Home Base ID (C3) |
| 3 | Replay Counter |
| 4 | Request Item |
| 5 | XOR Checksum |
Enumeration
Now that we have the command structure worked out, lets see what other commands could exist, for this we will simply increment the 4th byte in a brute force against the badge…
> TX A3 C3 E1 00 81
NO RESPONSE
> TX A3 C3 E2 01 83
RX: ACK
> TX A3 C3 E3 02 81
RX: PWR:308.1 TEMP:-83
> TX A3 C3 E4 03 87
RX: -23.78 133.74 ALT:624
> TX A3 C3 E5 04 81
RX: NO ASSETS ASSIGNED
> TX A3 C3 E6 05 83
RX: ALL SYSTEMS NOMINAL
> TX A3 C3 E7 06 81
RX: ACK RELEASING MISSION DATA
OP SPINIFEX: EYES ONLY
bsadl26{..redacted..}
> TX A3 C3 E8 07 8F
RX: REPORT LOGGED
> TX A3 C3 E9 08 81
RX: ACK
...
> TX A3 C3 E0 FF 7F
RX: ACK
>
Much success, many of the commands simply return ACK which doesnt provide us with an immediate answer, but we do have several interesting responses, one being clearly a flag!
More Hidden?
Talking with the badge maker it turns out there is actually 3x variations of this badge, which can be identified by a “tattoo” on the wombats foot.
The one I have is the Kangaroo which makes sense now with the STATUS output which included the call sign KANGAROO-1 and agent ID KNG-447
Working with some other attendees I was able to get the outputs from the Emu and the Wombat badges
Wombat
> STATUS
... (was missing this output)
> LOG
TX: A3 F2 DD 02 8E
RX: PWR:312.4 TEMP:-81
TX: A3 F2 DE 03 8C
RX: -31.22 136.81 ALT:163
TX: A3 F2 DF 01 8F
RX: ACK
TX: A3 F2 DF 01 8F
NO RESPONSE
TX: A3 F2 E0 07 B6
RX: REPORT LOGGED
Emu
> STATUS
AGENT ID : EMU-119
CALLSIGN : EMU-1
FIRMWARE : 3.1.0 / 2026
MODE     : COVERT
PWR      : 308.1 W
TEMP     : 22 C
STATUS   : ACTIVE
HOME BASE: A7
> LOG
TX: A3 A7 DD 01 D8
RX: ACK
TX: A3 A7 DE 01 DB
RX: ACK
TX: A3 A7 DF 02 D9
RX: PWR:312.4 TEMP:-81
TX: A3 A7 DF 02 D9
NO RESPONSE
TX: A3 A7 E0 03 E7
RX: -28.79 114.86 ALT:31
At this moment I have been unable to determine how to proceed on this multi badge approach, but hopefully the outputs will help others
Bonus Details
Each badge appears to give GPS coordinates for some interesting locations, and issuing the 03 command reveals an additional GPS coordinate.
Kangaroo
-23.78 133.74 ALT:624
-23.76 133.72 ALT:638
Pointing towards the “Pine Gap” Military installation from the USA in Central Australia
Emu
-28.79 114.86 ALT:31
Points towards the Australian Defence Satellite Communications Station (ADSCS) located in Western Australia
Wombat
-31.22 136.81 ALT:163
Points to Wommera in South Australia which is a major weapons testing range for Australia